How to do underfloor heating installation is something that hits its popularity. The subject was raised because it is an adequate option for heating devices. Many years ago, people focused on dealing with the air warmer. They still have to wear socks in the cold season. Knowing that toasty warmth in feet is also important. After this new way was invented and used, people realized that energy is more efficient.
One thing that is always mentioned is that it makes the room more stunning and effective. Radiators take space that is actually needed for putting other stuff. The safety issue that often occurs is also erased. Children and pets can run without being disturbed by a big device.
Contents
Underfloor Heating Installation and the Types
Here are two types of the heating system from underneath. Electric underfloor heating is the first and unfortunately the non-popular one. Actually, the starter for this type requires a cheaper cost.
But two things that make it unpopular are the high cost of the operation and the little warmth it can give. Electric-based using matting. It is simpler, but the heat is not enough to make the whole room warm. That is why this type is known more as an additional device. It boosts the work of the air room warmer that is already installed.
Another type is the common one, a water-based heating device. It uses a coil of pipes that siphons warm water to the whole pipework. Then it creates warmth in the entire room. This pipework is buried under the floor and shielded with a layer of screed. It is more common than the electric one because the heat produced is excellent.
Although it is installed underneath, the room on it is completely covered with warmth. The temperature stays long to fight winter cold. If the good insulation component in the room is installed properly, the temperature can stay even longer.
Compared to the electric one, the assembly is more complicated, more expensive and consumes more time. However, the operation cost is lower than the electric. If you encounter confusion to choose between these two, it’s better to consult with the engineer to assess what the best is. It will involve a good deal of information including the budget, room size, how long you will stay there, etc.
Wet Underfloor Heating Installation Detailed Steps
The steps will be quite long, but it is worth knowing the long run cost is cheaper than another underneath warmer. So, don’t hesitate to learn every step because it’s advantageous to make everything perfect.
Clean Up
The subfloor has to be clean of dirt and uneven surfaces. Some people underestimate this step because it seems cliché and not essential. Nonetheless, small things that have sharp tips can cause damage to the pipe. To lengthen the durability of the whole system, the cleaning-up activity has to be done meticulously.
Lay Insulation Board
This will help maintain the temperature effectively. By installing it with mushroom nubs, the system’s efficiency will be significantly improved, making the money spent on the system more worthwhile. The insulation board will prevent heat from escaping too quickly. Be sure to install this component properly, and don’t forget to secure the edges with tape for a better seal.
View this post on Instagram
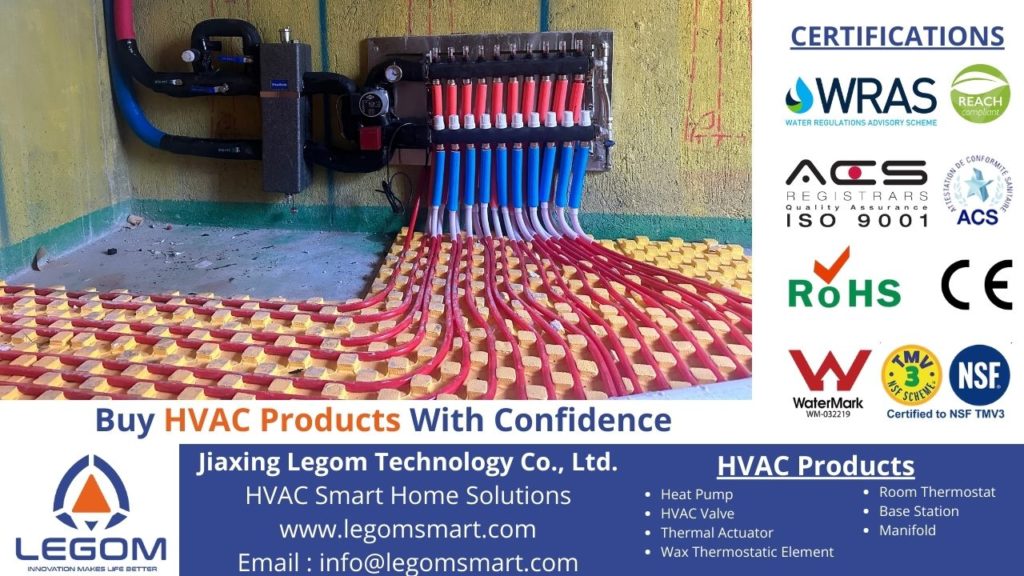
Manifold
Wondering what the pipes will hold on to? It is the manifold. The manifold will secure each indentation so as not to be a messy coil.
View this post on Instagram
Pipework Installation
After the three steps have been done, it is time to lay the core of the system, pipework. The length of the pipe is following the room size and the heat intensity that you want. The suggested distance between each pipe loop is 20 cm. However, always consult the engineer or the expert about this.
Checking
Do a pressure checking and examine all the underfloor heating installation work thoroughly. After the previous four steps, the screed will be laid. Before everything is covered, careful examination is highly needed. Check each inch of the pipe to avoid leakage. Check the pipe loop and make sure all the indentation is linked well to the manifold.
Install a Layer of Screed
When doing this process, set the pressure lower. It prevents high-pressure or over-tight.
Start the System
Connect everything and examine the work.
Finishing Floor
To beautify the room, lay flooring according to your expected color and pattern. But, before doing so, the previous 7 steps have to be carefully done. If there is trouble after installing the finishing floor, the renovation will cost you a fortune.
Those eight steps will take a maximum of two days for average house size. It also involves the presence of furniture. If the house is full of furniture, it requires more time. To have a faster project, it is better to install the system when the house is empty (at the beginning of the house-building process). For a larger house with difficult access to each room, it will take a longer time.
Looking for an OEM and ODM HVAC Manufacturer?

Legom is a tech company with a focus on HVAC smart home solutions. More than 90 countries already use our service. More than 400 partners already work together with us. We offer complete service, including customization of the product. With the certifications we have, the quality of our products is ready to compete. Our prices are also competitive. With many benefits, let’s be a good partner in providing underfloor heating installation support to the customers.